Map Editor
The Map Editor is used to create and edit the map your robots operate in: the rows, corridors, and regions that define where the robot can go and how it behaves.
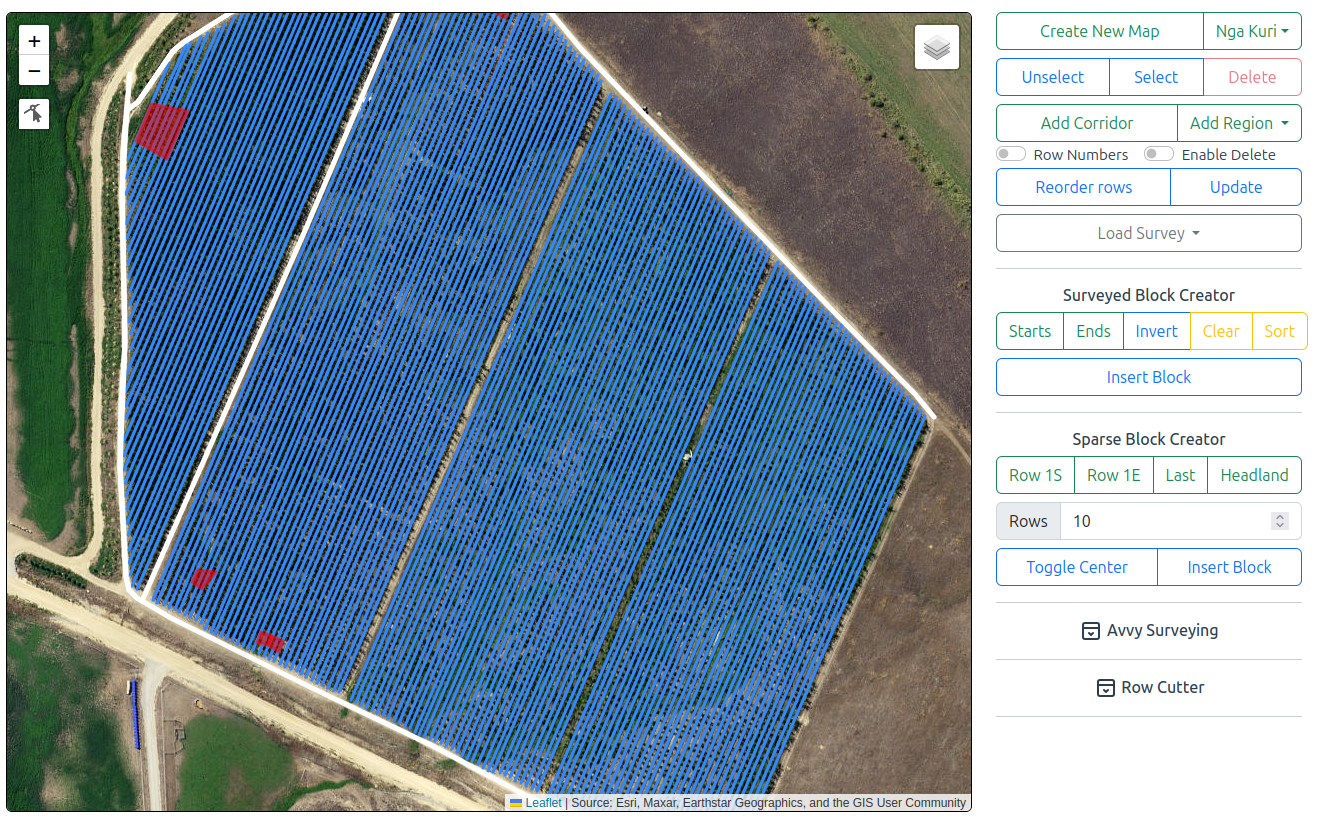
The Map Editor is the most complex tool in the dashboard, but it is mainly used during initial deployment. Whoever helps you set up your robots may give you additional training on it.
Leased robots
If you lease your robots, your map will usually be set up for you. It is still worth understanding how the Map Editor works, so you can make changes yourself during the season.
To open the Map Editor, select Tools > Map Editor.
The screen is divided into a map on the left and options on the right. The options are arranged from top to bottom in roughly the order you would use them.
Creating or Loading a Map
At the top of the options pane are two buttons:
| Button | Action |
|---|---|
| Create new map | Creates a new, empty map. |
| Load map | Opens an existing map for editing. |
To create a new map:
- Zoom and pan the map so it is centred on your farm.
- Click Create new map.
- Enter a name for the map.
To edit an existing map: click Load map and select the map from the drop-down.
The remaining steps are the same whether you have created a new map or loaded an existing one.
Saving Changes
Changes you make in the Map Editor are made to a local copy of the map. Nothing is changed on the server until you click Update.
Warning
Click Update when you have finished editing. Changes that have not been updated are not sent to your robots.
Editing Tools
Select, Unselect, and Delete
Use these tools to work with existing map entities: rows, corridors, and regions.
| Tool | Action |
|---|---|
| Select | Opens a lasso tool. Drag it over the rows and corridors you want to select. |
| Unselect | Clears the current selection. |
| Delete | Deletes the selected entities. |
To select a region, click on it.
Entities must be selected before they can be deleted.
Enable Delete
Enable delete is a safety toggle that protects against accidentally deleting rows. Turn it on when you need to delete something, and off again when you are done.
Row Numbers
Turn on Row numbers to display each row's number at the end of the row.
Reorder Rows
If your rows were added at different times, they may not be numbered in order from the first row to the last. Reorder rows renumbers only the rows you have selected. To fix the order:
- Turn on Row numbers.
- Click Select and lasso all the rows in the block.
- Click Reorder rows.
- Check the row numbers. If the order is reversed, click Reorder rows again to flip it.
Corridors
Corridors are the roadways the robot uses to travel around your farm, for example along headlands, between blocks, and to and from the charger. They are shown as white lines.
To add a corridor, click Add corridor and draw the corridor on the map.
Regions
Regions are areas of the map where the robot behaves differently. To add one, click Add region, choose the region type, and draw the region on the map.
| Region | Colour | Effect |
|---|---|---|
| No gun or speaker | Pink | The robot is completely silent: no bird banger and no audio. |
| No gun | White | The bird banger will not fire. The speaker and audio can still be used. |
| Stay out | Red | The robot will not operate in or travel through this area. |
| Allow GPS error | Dark blue | The robot may navigate without an RTK fix. |
| Obstacle | Yellow | A permanent obstacle the robot will not drive through. |
Regions are drawn as translucent shaded areas. White No gun regions should not be confused with corridors, which are drawn as solid white lines.
To remove a region, click it to select it, then click Delete.
No Gun or Speaker
Use this region where the robot must be silent, such as around a pack house, along a boundary with neighbours, or around a campsite.
No Gun
Use this region where the bird banger must not fire, such as near a road or along a boundary, but where the robot can still use its speaker for bird scaring.
Stay Out
Use this region to keep the robot out of part of the farm, for example where pickers or a spray operation are working.
A stay-out region affects the robot in two ways:
- Programs: If a program includes rows inside the region, the robot skips those rows.
- Routing: The robot will not use the region as a thoroughfare. If the direct route between two blocks passes through a stay-out region, the robot finds another route.
Allow GPS Error
Normally, the robot must have an RTK GPS fix to navigate. This region removes that requirement.
It is useful in areas where the robot regularly loses its RTK fix but has plenty of room, such as a wide headland under large trees.
Use with care
Inside this region, the robot may drift by half a metre or more to either side of its normal path. The robot still uses its cameras for navigation and obstacle detection, but only use this region in areas with no nearby hazards, such as waterways or roads.
Obstacle
Use this region to mark a permanent obstacle, such as a frost fan. The robot treats it as a permanent part of the map and will never drive through it.
An obstacle is drawn with a slightly larger outer boundary. This outer boundary is the path the robot follows to drive around the obstacle. If you place an obstacle in the middle of a row, the robot can drive around it and continue down the row, just as a tractor would.
Obstacles are also useful where a row ends short. Without an obstacle, the robot would normally extend the row out to the nearest corridor.
Setting Up a New Block
Setting up a new block involves three steps:
- Load a survey of the block.
- Create the rows with either the Surveyed Block Creator or the Sparse Block Creator.
- Add corridors along the headlands.
Loading a Survey
Select a survey from the Load survey drop-down. This lists all surveys recorded with the GPS Survey tool.
| Survey data | Shown as |
|---|---|
| Paths | Green lines |
| Points | Blue pins |
To use a survey from SW Maps, drag the exported GeoJSON file onto the map. It loads in the same way.
Choosing a Block Creator
| Block creator | Use when | What to survey |
|---|---|---|
| Surveyed Block Creator | You are unsure whether the rows are evenly spaced and straight. | The end of every row: every strainer post in a vineyard, or every row end in an orchard. |
| Sparse Block Creator | The block was accurately GPS-surveyed when planted, with consistent row spacing and no drift or taper. | The corners of the block, plus landmark strainer posts at any dog legs or curves in the headlands. |
Survey extra reference posts
Even when using the Sparse Block Creator, survey every 10th strainer post along each headland. These give you extra reference points to check the alignment of the rows.
Surveyed Block Creator
- Load a survey containing the ends of every row.
- Click Starts and lasso the pins at the start of each row, for example the north end of every row.
- Click Ends and lasso the pins at the other end of each row.
The estimated rows appear as red lines linking each start to its end. Use these tools to correct them:
| Tool | Action |
|---|---|
| Invert | Flips the matching of starts and ends. Use this if the rows are joined incorrectly, which can happen depending on the order the block was surveyed in. |
| Clear | Opens a lasso tool to hide unwanted pins, making it easier to select the starts and ends. |
| Sort | Attempts to order the rows east to west or north to south. Click it more than once if needed. |
- When the red lines match the rows, click Insert block. The rows are added to your local copy of the map.
- Click Update to save the rows to the server.
Sparse Block Creator
The Sparse Block Creator builds the block from three points and the headlands.
- Click Row 1 S and place it at the start of the first row.
- Click Row 1 E and place it at the end of the first row.
- Click Last and place it on the last row, usually on a strainer post.
- Use the Headland tool to draw a line across the headland at both ends of the rows. Each headland appears as a white line once placed.
Extend the headlands past the first and last rows
Every row must meet a headland at both ends. Any row that does not is dropped from the block.
Start each headland line slightly before the first row and finish it slightly past the last row. This makes sure small survey or alignment errors do not leave the outer rows without a headland.
The estimated rows appear as yellow lines.
- Set the number of rows in the block. The creator starts with 10 rows. If you are unsure of the number, use the up and down arrows until the rows align with the aerial imagery and your surveyed reference posts.
- Click Insert block.
- Click Update to save the rows to the server.
Adding Headland Corridors
Once the block is in place, add corridors along its headlands. These allow the robot to travel in and out of the rows and back to the charger.
- Click Add corridor.
- Draw a corridor along each headland.
- Click Update.
AV Survey
AV Survey lets you use a robot as a survey tool, which is useful if you do not have a GPS survey receiver with you. As you drive or push the robot around, it records points on the map that you can use as a reference.
- Select a robot from the AV Survey drop-down.
- Drive or push the robot to the locations you want to record.
| Button | Action |
|---|---|
| Path | Records a path as the robot moves. |
| Marker | Records a marker at the robot's current position. |
| Clear | Clears everything the robot has recorded. |
Surveying Row Centres
It is difficult to position the robot on a strainer post, so instead record the centre of each row:
- Drive the robot to the centre of the row at one end and click Marker.
- Repeat at the other end, and for each row you need.
To build a block from row-centre markers with the Sparse Block Creator:
- Place Row 1 S, Row 1 E, and Last on the row-centre markers.
- Turn on Toggle center. This tells the Sparse Block Creator that the points are row centres rather than the rows themselves.
Row Cutter
Use the Row Cutter to cut a gap in existing rows, for example where a row stops for a power pole or frost fan and then continues.
Draw the area to cut out over the rows. The cut section is shown as a dull blue line linking the two parts of the row.
The row is still treated as one continuous row. However, combined with an obstacle placed in the cut-out area, the robot is allowed to leave the row line, drive around the obstacle, and return to the row centre to continue mowing or bird scaring.